
What is the “BIG 3” Upgrade?
The “BIG 3” (or sometimes called “The Big 4”) upgrade is highly recommended as one of the first upgrades you should perform to your vehicle’s electrical system, especially when adding aftermarket audio components. This upgrade will increase the current handling capabilities of your electrical system, thus improving the performance of your power-hungry audio system. The factory wiring in your vehicle’s stock electrical system is often thinner diameter (gauge) and cannot handle the needs of anything more than the stock audio system and accessories. With the Big 3 upgrade, a larger diameter wire is either added to or is used to completely replace the OEM wiring within the vehicle’s charging system.
Let’s look at the purpose of this upgrade in layman’s terms. Think of your electrical system’s wiring as a river. The narrower the river, the less water can flow from one point to the other. The same concept is said for the wire diameter in your vehicle’s electrical system. The narrower the diameter of the wire, the more resistance there will be, which limits the amount of current flowing through the wire. By upgrading the wire to a larger diameter, say to 0 gauge, you are lowering the resistance allowing more current to flow freely throughout the electrical system. This increase in overall current can eliminate some effects of adding a larger audio system, such as dimming headlights and the dropping of voltage during prolonged periods of bass. This increase in current flow will also reduce the stress on the other components in your electrical and charging system, such as the alternator. There are several ways you can supplement this upgrade, such as installing a high-output alternator or adding more batteries*, but for this post, we will focus on the Big 3 and how to perform it.
What Does the BIG 3… Upgrade?
The BIG 3 upgrade is performed to replace or supplement the three major cables within your vehicle’s electrical and charging system. These cables are as follows:
- The main positive (+) cable running from the alternator to the positive terminal of the battery
- The negative (-) cable running from your battery to a grounding point on the vehicle’s chassis
- The ground cable that typically runs from the engine block to a grounding point on the vehicle’s chassis
- OPTIONAL (why it is sometimes called the “BIG 4”): Adding a ground cable from the alternator case to a grounding point on the vehicle’s chassis
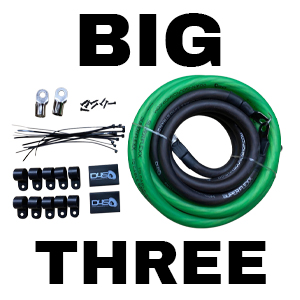
What You Need to Perform Your BIG 3 Upgrade
There are several items that you want to have to perform this upgrade to your vehicle. This list will get you set up and ready to start your project.
- Ideally, you will want to purchase yourself a BIG 3 Upgrade Kit. If you can’t find a pre-made kit to fit your needs, then you will need to get some good quality wire. I recommend 1/0 gauge tinned OFC (oxygen-free copper). Make sure your wire length is long enough to run from the alternator to the positive battery terminal and to run from the negative terminal and engine block to a chassis grounding point.
- Ring terminals (lugs) that will not only fit the wire but will also fit the battery terminals or distribution blocks (if installed).
- Fuse holder (I’ll explain this later)
- Multimeter
- Heat shrink and cable ties
- Wire strippers, wire cutters, and crimping tool
- Heat gun, Soldering iron with solder, basic hand tools (socket set, wrenches, etc)
Installation of the BIG 3
Now that you have what you need and are prepared, let’s dive into how to complete this install.
Planning
Plan. I mean it! Plan your wire routing. You want to make sure you have a layout as to where you are going to run your wires. Be sure they will not contact any moving parts such as pulleys, fans, etc., or come into contact with extremely hot parts like the exhaust. You also have to keep in mind that the engine will move during operation, so getting your cable lengths correct is critical to ensure they are not too short, or too long. Also, check the grouping locations. You may have to create new locations for your grounds if the factory locations are not sufficient enough for the purposes of the BIG 3 upgrade.
Prepare Your Wires
Now that you have a game plan, and your layout down. Prepare your wires. Cut the wires to the lengths you need with the wire cutters (unless you are using a pre-made BIG 3 kit) and strip back just enough of the insulation to fit the wire into the ring terminal. Then attach the ring terminals to the ends of the cable by crimping them onto the wire completely with either a hydraulic, or hammer-type crimper. Once secure, add heat shrink over the lugs, just behind the ring portion, and extending onto the wire. I suggest using at least 5/8” heat shrink to do this, and then hit it with the heat gun until it secured around the ring terminal and the wire. This will aid in protecting the ends of the wires and make them a little more weather resistant.
Getting Started
Next, DISCONNECT THE BATTERY. Never try to work on your vehicle’s electrical system without first disconnecting the battery. You can cause serious electrical damage to your vehicle, hurt yourself, or even burn your car down. Who wants that, right?
The “Positive” of the BIG 3
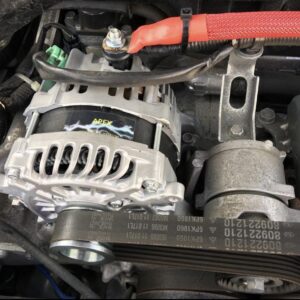
Once your electrical system is disconnected, it’s time to run your wiring. Personally, I like to start with the wire from the alternator to the positive battery terminal. In some instances, this will be the trickiest wire to run, depending on where your alternator is located within the engine bay. If the stock wire seems to be fine, you can leave it in place and run the upgraded wire alongside it. If not you may completely replace it with the new, larger diameter wire. To do this, remove any cover that may be on the post from the alternator. Loosen, then remove the nut holding the stock wire into place. I have found that many larger ring terminals will not fit directly onto the alternator’s post, so some alterations may need to be made to the plastic around the post in order for the ring to fit properly. If the new ring terminal fits well, attach the ring to the post by reinstalling the nut and tighten it down. Now, run the new wire along the stock wire (if kept in place) by using plastic cable ties (about every 5”) to attach it securely to the stock wire, remaining aware of any moving parts or parts that may become hot, and then on to the positive battery terminal. Be aware that some stock alternator wires may run directly to the positive battery terminal, or it may run directly into the fuse box, so keep that in mind as well and connect it accordingly. In the “What You Need” section, I listed a fuse holder as one of the parts you may need. This is where it would possibly come into play. Depending on how long the positive run is and how tightly you can secure it out of the way, will determine if you should install a fuse between the alternator and the battery. On my vehicle, the 1/0 wire is so neatly, and tightly run on top of the factory alternator wire, that I decided not to run an inline fuse, but this may not always be the case. Use your best judgment to decide whether or not you should, or should not install an inline fuse.
Stay “Grounded”
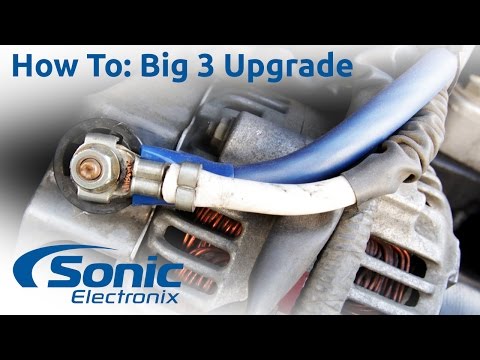
The positive wire is now taken care of, now, it’s time to work on the ground wires. Usually, the ground from the engine block to the chassis is a little more difficult, so my suggestion is to tackle this wire next. Try to locate the factory ground from the engine block to the chassis. It will sometimes be a braided, flat, bare wire from the block to a grounding point on the chassis. Once you have located this wire, unbolt it from the engine block and chassis and then reinstalling your new wire. Do not forget to clean the area around the chassis ground before installing this end of your ground. Be sure to remove any rust, grime, or paint first, that install your wire. You can clean the area with a rotary wire brush on a drill, or a piece of sandpaper, but the main thing is to get that surface nice a clean to ensure a proper ground. Keep in mind that sometimes you will have to run a new cable to a new point on the chassis where you may need to drill a hole, clean the surface and then bolt the wire to the new grounding point.
Okay, engine ground taken care of, so onto the battery ground. In most cases, your new wire can just be run alongside the factory ground wire to the grounding point on the chassis. Be aware that some factory grounds from the battery are ground to areas that are not considered good grounding points when it comes to a BIG 3 upgrade. This would include areas like the fender, or some other thin piece of metal such as a fender brace. If you have a ground like this, find a new place to ground your new wire. Take the same steps as described above to create a new grounding point and then run your wire from the negative battery terminal to your new grounding point, making sure that it has been properly cleaned, then secure your new ground with a nut and bolt.
OPTIONAL: Earlier in this post, I described the BIG 3 as sometimes being called the BIG 4. Well, here’s why. If you spared yourself enough wire, it is also a good idea to reinforce your grounds by grounding the alternator’s case to the chassis as well. This is done by running a ground wire from the alternator’s case (or where it mounts to the engine) to a spot on the chassis. This will ensure that your grounds are significant enough. This connection is similar to the engine block to chassis ground, so follow the same procedures to install this wire as well.
Check Yourself, Before You Wreck Yourself
Once you have all of your nice, new, larger diameter wires run, make sure they are secured with cable ties, and out of the way of any objects that could possibly damage them and cause you issues down the road. After securing them, make sure all of your connections are tight, and then check the resistance of the new wires with a multimeter before reconnecting the battery. You should see no more than one ohm for the reading. After this, reconnect your battery. Start your vehicle to ensure that you have no issues with engine movement and that no wires are touching anything they should not be, if so turn the engine off, and take this time to fix any issues that you may find. If all is good, your voltage should remain a constant 13.8 to 14.5 or so, with the engine running. A good idea would be to install a voltage meter to ensure your voltage never drops to a dangerous level for your audio equipment. That’s it!
I hope this post has shed a little light on why and how the BIG 3 should be installed and how it can benefit your vehicle’s electrical system.


Pingback: Isolators vs Separators