
In one of my previous posts here on the D4S Blog, I discussed how to set your amplifier’s gain setting by using tools such as the SMD DD-1 or an oscilloscope (O-scope), but if you are new to car audio, or on a budget, you may not have these tools on hand to set your gains. This is why, in this post, I will go over the process of setting your gains using what is known as Ohm’s Law and a typical multimeter.
We all know that the gain setting is important because it helps to prevent damage to your speakers and subwoofers by matching the amplifier to match the head unit’s output voltage. This ensures the amplifier is not overly boosting the head unit’s signal causing distortion, or clipping of the audio signal. This is why it is imperative that the gain level of the amplifier be set properly.
NOTE: Please be aware that using this method to set your amplifier’s gain is NOT AS ACCURATE as using an SMD DD-1 or an O-scope. Using Ohm’s Law is not a guaranteed method of setting gain, it is only approximate due to factors such as frequency changes and box design, and will affect your overall impedance of your driver. Though it is not as accurate, this method will get your amp’s gain setting close to where it should be.
Ohm’s Law
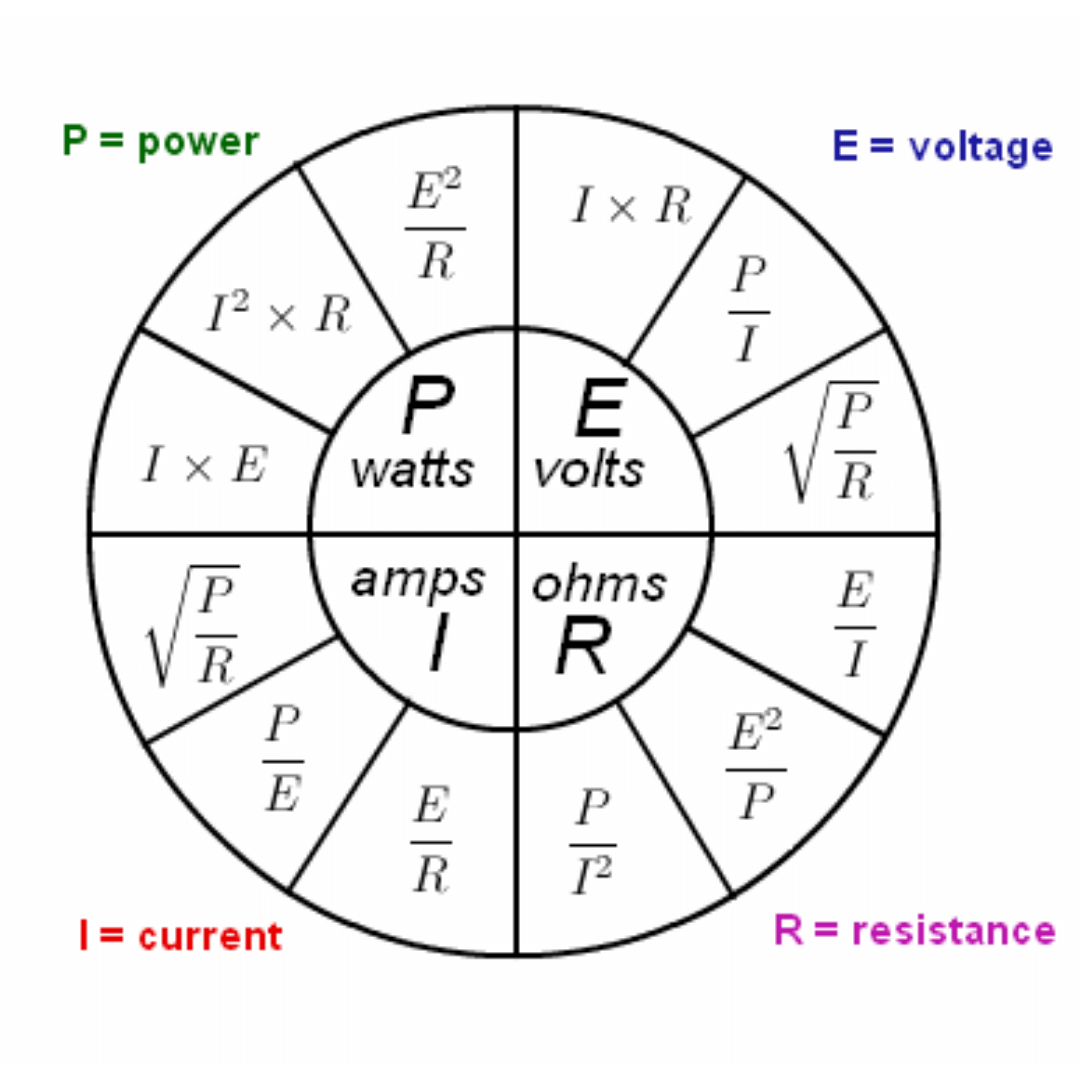
So what is Ohm’s Law? Ohm’s Law, by definition, is a mathematical formula used to calculate the relationship between voltage, current, and resistance within an electrical circuit. It is represented by the written equation of E = I x R or voltage = current x resistance. In order to set your amplifier using Ohm’s Law, we will use the equation E = sqrt(R x P).
Setting Your Amplifier’s Gain
Step 1. Be sure to disconnect all of the speakers from your amplifier(s). This is to prevent damage to your speakers while setting the gain to the correct position (which will be determined in an upcoming step).
Step 2. Make sure all of the audio settings within your head unit are set to their lowest or flat settings. This means to turn off bass boost, loudness, DSP functions, and EQ and set the BASS and TREBLE to zero.
Step 3. Set the amplifier’s gain setting to its absolute minimum, or zero. In a majority of amplifiers, this means turning the gain adjustment to the far left, or counter-clockwise (CCW).
Step 4. Because we do not have an O-scope or DD-1, we will not know the clipping point of your head unit. This is why we will use, what I call, the 75% rule. This means you will set your head unit’s volume to 75% of its maximum. To do this, find the max volume level of your head unit by turning the volume all the way up (without playing any audio signal). Take the maximum volume setting number, let’s say 100, to keep things simple. Take that number 100, and now divide it by .75. This will yield a volume level of 75. This is where you need to set your head unit to be at 75% volume.
NOTE: We are using the 75% rule because, not only can we not find the clipping point of the head unit, almost all head units available today will clip, or distort, the audio signal before max volume.
Step 5. In this step, we will determine the output voltage that we will need to adjust our gain setting. To figure out the voltage needed, we will now use the equation V = sqrt( R x P) or translated, voltage = square root of (resistance x power output). I know, it sounds confusing right now, but let’s walk through the process. In our example, we will say that the amplifier we are setting up is 1000W RMS at 2 ohms. Based on this information, our formula would look like this. 1000W x 2 ohms = 2000. Now take the square root of 2000, which would equal 44.72V. This is now the target voltage output reading of the amplifier.
NOTE: This calculation is also factoring in that your subwoofer(s) will be wired at the nominal 2 ohms the amplifier requires for maximum RMS power output. These figures will change based on the final impedance of your subwoofers or speakers.
Step 6. Now that we know what our target output voltage is (44.72V) we can now begin the process of setting the gain of the amplifier. To do this, use a CD or a USB drive containing a sine-wave test tone in the frequency range of 50Hz – 60HZ for subwoofer amplifiers and 1000Hz for other amplifiers. Set your head unit to 75% volume and set it to play the required tone repeatedly. This will give you the time necessary to adjust the gain setting without having to restart the test tone.
NOTE: The reason we will use the frequency range of 50Hz to 60Hz for a subwoofer amplifier is that most multimeters become highly inaccurate below this frequency range.
Step 7. While your test tone is playing, grab your multimeter and set it to read AC voltage, and then connect it to the speaker terminals of your amplifier. Red lead to the positive speaker terminal and the black lead to the negative speaker terminal. If done properly, you will notice a low voltage reading on the multimeter. Now, slowly begin to turn the gain adjustment knob to the right until you reach, or are close to your target voltage. Which for our example, was 44.72V. Once your multimeter reads at or is close to your voltage target, then stop turning the gain adjustment. I typically will back the gain setting off just slightly, but that is a personal preference.
Step 8. If you have multiple amplifiers in your car audio setup, you will use this same method with every amplifier in order to set their gain adjustments. Keep in mind the target voltages will change if you are setting up different amplifiers (subwoofer vs. midrange amplifiers).
Finalize and Test
Once your amplifier(s) have been set to read your target voltage, you can now reconnect all of the speakers to their respective amplifiers. To test your settings, you may now play a music track and listen for distortion which can sound like buzzing, hissing, or loud crackling. If all sounds good, then you have property set your amplifier gain by using Ohm’s Law and your multimeter.
Conclusion
I hope this post has given you the knowledge needed to set your amplifier gains using Ohm’s Law and the multimeter method. Though this is not the recommended way to perform this task, it can get you fairly close to where you need to be in order to prevent damage to your speakers or subwoofers. As you gain more knowledge and as budget permits, I highly recommend investing in either the SMD DD-1 or an oscilloscope. These tools will become the most used tools in your arsenal as you become more versed in the installation of your car audio systems.
Shop DOWN4SOUNDSHOP.COM for all your favorite car audio brands. Experience the DOWN4SOUND DIFFERENCE.
- Lowest possible prices on all your favorite car audio brands
- We stock the most products in our warehouse
- The best customer service in the industry
- Free shipping
- Financing plans available
- Free goodies with every order!
DISCLAIMERS:
** Please note that this article provides general information on how to perform the task of setting amplifier gains using Ohm’s Law and a basic multimeter. Keep in mind that not all vehicles are the same and may require different installation methods and techniques to ensure a safe and effective install. By no means, am I a professional mechanic or car audio installer, and D4S and I, are not liable for any damages cause to your person or vehicle by following these instructions. Please consult a professional if you have any questions or concerns regarding your own vehicle and how to perform modifications such as the one explained in the previous statements.


comments (0)